Violin Tuning Mastery: Expert Techniques with Digital Tuners
Every violinist knows the frustration of a performance about to begin while the instrument refuses to stay in tune. Whether a peg slips the moment you touch it or a fine tuner reaches its limit, achieving perfect pitch is a common challenge. For many players, the leap from basic tuning to professional-grade precision feels like a mystery.
How can you achieve a perfectly tuned violin every single time?
The secret lies in combining traditional physical techniques with modern digital precision. By understanding how your instrument reacts to tension and using a free violin tuner, you can eliminate the guesswork. This guide walks you through expert methods to master your violin's sound, ensuring your strings are always stage-ready.

Professional Violin Tuning Techniques
Mastering the violin requires more than a good ear. It requires a deep understanding of how the instrument produces sound. Professional violinists don't just turn a peg and hope for the best. They follow a systematic approach that respects the delicate wood and string tension.
Understanding the Physics of Violin Tuning
At its core, tuning a violin is about managing vibration frequencies. Each violin string vibrates at a unique frequency, measured in Hertz (Hz). The A4 string, for instance, standardly hits 440Hz. When you tighten a string, you increase the tension, which raises the frequency and the pitch.
Because the violin is made of wood, it is highly sensitive to the environment. Changes in humidity and temperature cause the wood to expand or contract. This shifting directly affects string tension. Professionals understand they aren't just tuning strings; they are balancing the entire physical structure. To see the physics in action, you can watch how the waveform changes in real-time.
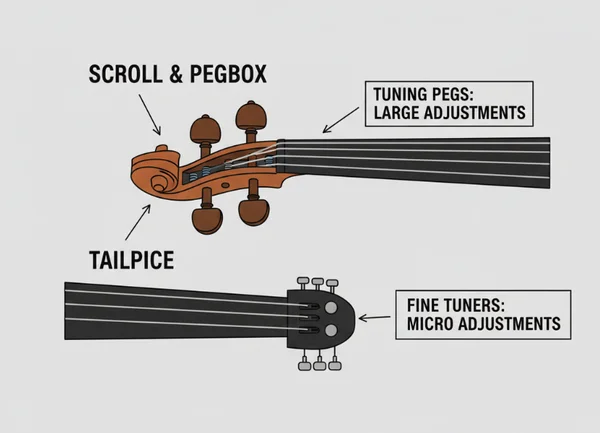
The Critical Difference Between Pegs and Fine Tuners
One of the first lessons in professional tuning is knowing which tool to use. Pegs and fine tuners serve two very different purposes. Pegs are located at the scroll and handle large adjustments. If your string is a whole note or more out of tune, you must use the peg.
Fine tuners are tailpiece screws for micro-adjustments. Use them when you’re within a few cents of perfect pitch. Using a peg for a tiny adjustment often leads to overshooting. Conversely, using a fine tuner for a large adjustment can damage the tailpiece or cause the screw to jam.
Step-by-Step Tuning Workflow for Optimal Stability
To achieve the best stability, follow this professional workflow:
- Tune the A string first: This is the standard reference point for the entire ensemble.
- Use the "Push and Turn" method: When using pegs, always apply a slight inward pressure toward the pegbox while turning. Friction keeps the peg from slipping back.
- Tune from below the note: It is always better to tune "up" to a note. If the string is sharp, tune it down below the target pitch and slowly bring it back up. This seats the tension evenly across the bridge.
- Check the bridge angle: High-tension tuning can pull the bridge forward. After a major session, ensure your bridge is standing straight.
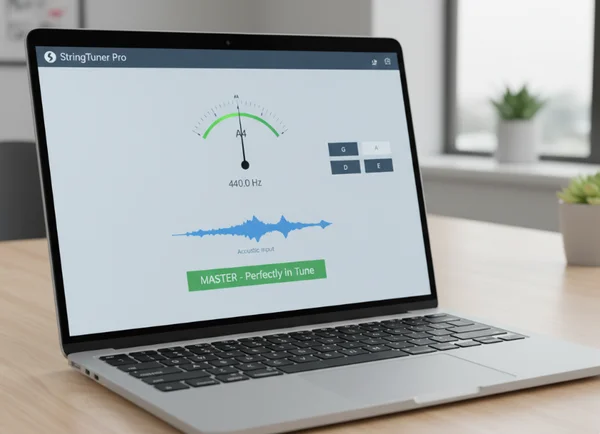
Online Tuner for Violin: Leveraging Digital Precision
Forget clunky hardware tuners! TunerNinja’s browser-based tool delivers pro-grade accuracy, so your violin sings true in seconds. Modern technology allows for a level of precision that the human ear sometimes struggles to catch.
Why Digital Tuners Outperform Traditional Methods
While many teachers emphasize "tuning by ear," digital tools provide a necessary visual safety net. Traditional mechanical tuners can be bulky and expensive. In contrast, TunerNinja’s precision tool provides immediate, visual feedback that is far more granular.
Digital tools spot pitch shifts as tiny as ±0.1 cents—inaudible to most ears. This razor-thin accuracy keeps ensembles perfectly synced. By using a digital tool, you ensure your tuning is mathematically correct. This is essential for group play where everyone must share the exact same frequency.
Maximizing Accuracy for Violin Strings
To get the most out of digital tools, you should understand advanced features. High-precision pitch detection algorithms are specifically designed to filter out background noise. When you use the dashboard, it shows you exactly how far you are from the center.
The "Ninja Level" system isn't just for fun; it encourages higher accuracy. For a violinist, reaching the "Master" level means your strings are perfectly balanced. This feedback helps you learn exactly how much force to apply to your fine tuners to move the pitch a fraction of a cent.
Positioning Your Violin for Optimal Microphone Detection
To get an accurate reading, your setup matters. Follow these tips for the best results:
- Quiet Environment: Find a room with minimal background noise so the microphone only picks up the violin.
- Distance: Hold your violin about 12 to 18 inches from the microphone. If it is too close, the sound might distort.
- F-Hole Alignment: Point the f-holes toward the microphone. This ensures the strongest possible signal for the microphone tuner to analyze.
Violin Peg Tuning: Fixing Slippage Like a Pro
Nothing is more frustrating than a violin peg that refuses to stay in place. This is a common issue for all players, especially when the seasons change. Understanding how to manage your pegs is a vital part of instrument maintenance.
Identifying the Causes of Peg Slippage
Pegs slip because of a lack of friction. Since pegs are held in place purely by wood-on-wood contact, any change in the wood causes issues. Common causes include:
- Low Humidity: Dry air causes the wood to shrink, making the peg slightly smaller than the hole.
- Worn Pegs: Over time, pegs can become "out of round" or no longer perfectly circular.
- Incorrect Winding: If the string is not wound correctly, it can pull the peg outward.
The Proper Technique for Peg Winding and Tension
To fix a slipping peg, you must wind the string properly. As you wind the string onto the peg, the final coils should be close to the wall of the pegbox. This creates a natural "pull" that keeps the peg pushed firmly into the hole.
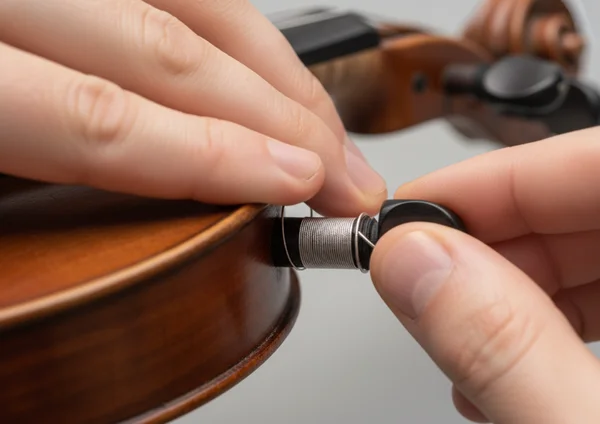
If your pegs are sticking, you can use a small amount of "peg dope" or graphite from a pencil to lubricate them. If they are slipping, specialized peg drops increase friction. Always remember to check your pitch after every adjustment to ensure you haven't overstressed the string.
When to Seek Professional Help for Peg Issues
Sometimes, a DIY fix isn't enough. If your pegs constantly slip even after correct winding, they may need to be "fitted" by a luthier. A professional can shave the pegs and pegbox holes so they match perfectly again. If you see cracks in the pegbox, stop tuning immediately. The tension could cause the wood to split further.
Fine Tuner Mastery: Hitting Perfect Pitch
Once your pegs have brought the string close to the note, fine tuners take over. These small mechanisms allow for the perfectionist level of tuning that professional performance requires.
The Science Behind Fine Tuner Adjustments
Fine tuners work on a lever or screw principle. As you turn the screw clockwise, it pushes a lever that pulls the string tighter. Because the screw threads are very fine, one full turn only moves the string a tiny amount. This allows for extreme precision.
When you use an online chromatic tuner, you can watch the needle move in tiny increments as you turn the screw. This visual feedback is the fastest way to learn the "feel" of your fine tuners.
Common Mistakes in Fine Tuning and How to Avoid Them
The most common mistake is letting the fine tuner screw get too low. If the screw is turned all the way in, it can touch the top of the violin. This causes scratches or even cracks in the wood.
Pro Tip: If your fine tuner is getting low, unscrew it almost all the way. Then, use the peg to bring the string back to the correct pitch. This "resets" the fine tuner so you have room for future adjustments. Avoid using the fine tuner when the pitch is more than a half-step off, as this strains the tailpiece.
Tuning by Ear: When and How to Supplement Digital Tuners
Even with the best digital tools, a professional violinist should develop their ear. Digital tuners tell you if the note is correct, but your ear tells you if the intervals between strings sound harmonious.
A good practice is to use a standard reference tone to tune your A string. Then, try to tune the D, G, and E strings by listening to the "perfect fifth" interval. Once you think you have it, check your work against the digital dashboard. This builds your internal sense of pitch while ensuring you stay perfectly in tune.
Conclusion
Think of tuning like ninja training—every tweak hones your precision. With TunerNinja’s real-time feedback, you’ll level up faster than a stealthy shuriken throw! By understanding the physics of your instrument and mastering the "push and turn" peg technique, you ensure your violin always sounds its best.
Modern web tools make professional accuracy accessible to everyone. Whether you are a student preparing for a recital or a teacher looking for a reliable tool, the right technology makes all the difference. Ready to experience ninja-level precision? Visit our precision violin tuner and take your performance to the next level today.
FAQ Section
How often should I tune my violin to maintain stability?
You should check your tuning every time you pick up the instrument. Even a 15-minute break can allow the temperature to shift your strings. For maximum stability, check your pitch with TunerNinja’s web app before you start practicing and again halfway through your session.
Can online tuners really match the accuracy of professional tuners?
Yes. Modern tools use advanced digital signal processing that matches or exceeds the accuracy of many hardware tuners. With a precision of ±0.1 cents, these tools are trusted by professional musicians for high-stakes performances.
Why do my violin pegs keep slipping even after tuning?
Pegs usually slip because of low humidity or improper winding. Make sure you are pushing the peg inward as you turn it. If the problem persists, ensure your strings are wound close to the pegbox wall to create lateral tension that holds the peg in place.
What's the proper order for tuning violin strings?
The standard professional order is A, D, G, and then E. We start with the A string because it is the universal reference pitch. Tuning in this order helps balance the tension across the bridge and the body of the violin. To get started, simply use our interactive tuner and follow the prompts.